Microsoft Azure SQL Database

Use Microsoft Azure for Ad-Hoc Testing

Microsoft Azure provides a rich set of features which can be used and setup very easy and very quick. Therefore it’s the recommended way for doing ad-hoc tests and try out quick some things. In this post I will show how to use Microsoft Azure SQL Database to quick test some Transact-SQL statements.

All interaction done with a relational database is done in SQL (Structured Query Language). SQL is a standard of both the International Organization for Standards (ISO) and the American National Standards Institute (ANSI). Microsoft’s dialect of the SQL standard, which is used to interact with Microsoft’s SQL Server and Microsoft Azure SQL Database, is called Transact-SQL (T-SQL).

T-SQL is the main language used to manage and manipulate data in Microsoft’s main relational database management system, SQL Server, whether on premise or in the cloud (Microsoft Azure SQL Database).

If you don’t have a Microsoft Azure subscription until now, you can make use of 250 CHF voucher business subscription of Microsoft Azure. Have a look at Trial Offer for Microsoft Azure for more information.

Create an Azure SQL Database

Now that you hopefully have an Azure subscription, you can create an Azure SQL Database instance to use for this post.

    1. Browse to http://portal.azure.com. If you are prompted to sign in, do so with the Microsoft account that is associated with your Azure subscription.
    2. At the bottom of the Hub menu (the vertical bar on the left), click New (represented by a + symbol if the menu is minimized), and then in the New blade that appears, click Databases, and then click SQL Database.
Create Azure SQL Database

Create Azure SQL Database

  1. In the SQL Database blade:
      1. Enter the name AdventureWorksLT
      2. In the Subscription box, ensure that your subscription is listed.
      3. In the Resource group section, ensure that New is selected, and enter TSQL_Quick_Try as the new resource group name.
      4. In the Select Source list, select Sample.
      5. In the Select sample section, ensure that AdventureWorksLT[V12] is selected.
      6. Click Server. Then click Create a new server and enter the following details and click OK.
        • A unique Server name for your server (a red exclamation mark will be displayed if the name you have entered is invalid or already in use, otherwise a green tick is shown).
        • A user name you want to assign to the Server admin login. This can be your
          name or some other name you’ll remember easily – however, you cannot use
          “Administrator”.
        • A Password for your server administrator account. This must meet the password
          complexity rules for Azure SQL Database, so for example it cannot be blank or
          “password”.
        • The Location where your server should be hosted. Choose the location nearest
          to you.
        • Leave the option to allow Azure services to access the server selected (this
          opens an internal firewall port in the Azure datacenter to allow other Azure
          services to use the database).

        New SQL Server

        New SQL Server

      7. In the Pricing Tier section, select Basic.
      8. Ensure that your selections are similar to those below, and click Create.

    SQL Server Pricing Tier

    SQL Server Pricing Tier

  2. After a short time, your SQL Database will be created, and a notification is displayed on the
    dashboard. To view the blade for the database, click Resources Groups and then click on TSQL_Quick_Try Resource Group.

    TSQL_Quick_Try Resource Group Essentials Blade

    TSQL_Quick_Try Resource Group Essentials Blade

Configure Firewall Rules for your Azure SQL Database Server

  1. In the TSQL_Quick_Try blade, under Essentials, click the server name for your database
    server (which should be in the format server_name.database.windows.net). In my case that is tsqlquicktry042.database.windows.net

    Azure SQL Server Show Firewall Settings

    Azure SQL Server Show Firewall Settings

  2. In the blade for your SQL server, under Essentials, click Show firewall settings.
  3. In the Firewall settings blade, click the Add client IP icon to create a firewall rule for your client
    computer, and then click Save.

    Azure SQL Srver Firewall Add Client IP

    Azure SQL Srver Firewall Add Client IP

Note: Azure SQL Database uses firewall rules to control access to
your database. If your computer’s public-facing IP address
changes (or you want to use a different computer), you’ll need
to repeat this step to allow access. Alternatively, you can modify
the firewall settings for your Azure SQL Database server
to allow a range of IP addresses – see the Azure SQL Database
documentation for details of how to do this.

Installing and Connecting from a Client Tool

SQL Server Management Studio is the primary management tool for Microsoft SQL Server, and you can also use it to manage and query Azure SQL Database. If you do not already have SQL Server Management Studio installed, you can download it from Download SQL Server Management Studio (16.5). When the download is complete, run the executable file to install SQL Server management Studio.

After installing SQL Server Management Studio, you can start it and connect to your Azure SQL Database server by selecting the option to use SQL Server authentication, specifying the fully-qualified name of your Azure SQL Database server (<your_server_name>.database.windows.net), and entering your user name in the format <your_user_name>@<your_server_name> and password, as shown here:

Connect to Azure SQL Database

Connect to Azure SQL Database

After connecting, you can create a new query and run it by clicking Execute, and you can save and open Transact-SQL scripts. Be sure to select the AdventureWorksLT database when running your queries as shown here:

Run Query in MS SQL Server Management Studio

Run Query in MS SQL Server Management Studio

Here is also the T-SQL Statement I tried. You can copy it and try it in your Azure SQL Database:

Original Post: https://www.redtoo.com/ch/blog/use-microsoft-azure-for-ad-hoc-testing/

redtoo Trial Offer for Azure

Trial Offer for Microsoft Azure

Just in time for the Swiss National holiday on August 1., there is a new opportunity for Swiss companies to try out Microsoft Azure. The Swiss company where I’m working at, redtoo, located in Basel offers a 30 days trial account for first time subscribers of Microsoft Azure.

To find out more, have a look at: https://www.redtoo.com/ch/de/azure-computing/

WWW Internet

Key Concepts of International Web Design

The primary activity of the World Wide Web Consortium (W3C), is to develop protocols and guidelines that ensure long-term growth for the Web. The widely adopted Web standards define key parts of what actually makes the World Wide Web work.

A fundamental concern and goal of the W3C since the beginning has been the access to the Web for all. It is easy to overlook the needs of people from cultures different to your own, or who use different languages or writing systems, but you have to ensure that any content or application that you design or develop is ready to support the international features that they will need [1].

The following 7 quick tips summarize some important concepts of international Web design:

  1. Encoding: use the UTF-8 (Unicode) character encoding for content, databases, etc. Always declare the encoding.
  2. Language: declare the language of documents and indicate internal language changes.
  3. Navigation: on each page include clearly visible navigation to localized pages or sites, using the target language.
  4. Escapes: use characters rather than escapes (e.g. &#xE1; &#225; or &aacute;) whenever you can.
  5. Forms: use UTF-8 on both form and server. Support local formats of names/addresses, times/dates, etc.
  6. Localizable styling: use CSS styling for the presentational aspects of your page. So that it’s easy to adapt content to suit the typographic needs of the audience, keep a clear separation between styling and semantic content, and don’t use ‘presentational’ markup.
  7. Images, animations & examples: if your content will be seen by people from diverse cultures, check for translatability and inappropriate cultural bias.

Bibliography

  1. Richard Ishida, W3C.: Internationalization Quick Tips for the Web 2015-04-01 13:22.
    Retrieved: 29.06.2016.
Microsoft Logo

Microsoft released Version 1.0 of .NET Core and ASP.NET Core

Today, June 27. Microsoft announce the release of .NET Core 1.0, ASP.NET Core 1.0 and Entity Framework Core 1.0, available on Windows, OS X and Linux after they first announced the project 18 month ago. Microsoft says that more than 18’000 developers from 1’300 companies have contributed to the cross-platform, open source, and modular .NET platform for creating modern web apps, micro services, libraries and console applications. The platform is maintained by Microsoft and the .NET community on GitHub.

The characteristics of .NET Core are:

  • Flexible deployment: Can be included in your app or installed side-by-side user- or machine-wide.
  • Cross-platform: Runs on Windows, macOS and Linux; can be ported to other OS’s. The supported Operating Systems (OS), CPUs and application scenarios will grow over time, provided by Microsoft, other companies, and individuals.
  • Command-line tools: All product scenarios can be exercised at the command-line.
  • Compatible: .NET Core is compatible with .NET Framework, Xamarin and Mono, via the .NET Standard Library.
  • Open source: The .NET Core platform is open source, using MIT and Apache 2 licenses. Documentation is licensed under CC-BY. .NET Core is a .NET Foundation project.
  • Supported by Microsoft: .NET Core is supported by Microsoft, per .NET Core Support

To get more information about .NET Core 1.0 see https://www.microsoft.com/net/core#windows

Functional Programming

The future of programming is functional

Some years ago it goes public that Professor Robert Hagner from the Carnegie Mellon University at Pittsburgh just canceled the freshmen lesson for Object Oriented Programming (OOP). His reason was, that OOP is from nature antimodular and antiparallel and therefore not suitable for modern curriculum of Computer Science Studies.

I thought: “Wow”. Just for generations the thinking of software programmers, analysts and architects and the whole industry was in “Objects” and now it’s simply canceled. But what is true is true. With the limitation of raising processor clock pulse to speed up computer, the trend is going to parallel work instead. With Windows Azure as example it’s easy to scale processor count used by an application from one to thousands, but the application must be able to make use of it. So, let’s start think functional by using Visual F#. Microsoft defines F# as “a multiparadigm language that supports functional programming in addition to traditional object-oriented programming and .NET concepts. It’s a first class member of the .NET Framework languages”.

There is no universally accepted definition of functional programming, but one of the most agreed attributes about the functional programming paradigm is, that programming is done with expressions or declarations instead of statements. To remember, a statement is doing something like assigning a value to a variable, jumping to a other line of the code or calling a subroutine, while an expression is any section of the code that evaluates to a value.

So, let’s start with giving names to values. In F# this will be done with the let keyword. It’s used to declare and to use identifiers:

// Integer and string.
let num = 10
let str = "F#"
// Storing integers and strings in a list.
let integerList = [ 1; 2; 3; 4; 5; 6; 7 ]
let stringList = [ "one"; "two"; "three" ]
// Perform a simple calculation and bind intSquared to the result.
let intSquared = num * num

Beside the simplification of implementing parallel and asynchronous tasks, the greatest benefit for enterprises to use functional programming is, that algorithm can be defined shorter and simpler. That lowers the maintenance costs of applications significant.

For a sample algorithm we will use a daily life example: we are searching on our laptop for documents, in our intranet for information related to our customers or in google for news and other information. This is called information retrieval and algorithms for that a mainly based on calculation of similarity which will be found out by calculating the distance between the searched terms existing in documents. One beside many of such algorithm is the Jaccard similarity coefficient.

The Jaccard similarity coefficient, also known as the Jaccard index, is a statistic method used for comparing the similarity and diversity of finite sample sets. It is defined as the size of the intersection divided by the size of the union of the sample sets.

Jaccard

Jaccard similarity coefficient

One point which should be mentioned is the difference between symmetric versus asymmetric nominal variables inside the data set.

A binary variable has two states, 0 and 1 and is called symmetric, when there is no preference for which outcome of the binary variable should be coded as 0 and which as 1. For example, the binary variable “gender” for a human has the possible states “female” and “male” Both are equally valuable and carry the same weight when a proximity measure is computed.

On the other side, a binary variable is asymmetric if the outcomes of the states are not equally important, such as the positive and negative outcomes of a disease test. It is usually the rares one by 1 (HIV positive) and the other by 0 (HIV negative).

Lets suppose that we have a bunch of sheets defining professional skills:

// A list of skills
// This employee is a system and data integration expert
let employee1Skills = [".NET"; "C#"; "WCF"; "WF"; "BizTalk"; "SOA"; "BPMN"; "EAI"; "ESB"]
// This employee is a project manager
let employee2Skills = ["PM"; "IPMA"; "PMI"; "PMP"; "PRINCE2"]
// This employee is a system engineer
let employee3Skills = ["SCCM"; "AD"; "DNS"; "DHCP"; "GPO"; "SAN"; "LAN"; "WAN"]

and further a set of skills desired by a vacant job of a company:

// A companies vacant job for a Network Project Manager
let vacantJob = ["BPMN"; "WF"; "DNS"; "DHCP"; "LAN"; "PM"; "PMP"; "PRINCE2"]

The Jaccard coefficient is now a useful measure of the overlap of attributes of one of the employee skill sets (we will call ‘A’) and the vacant job skill set (we will call ‘B’).

// Prepare the common set operations needed by the Jaccard Coefficent function
let jaccardCoeff (first : string list) (second : string list) =
    let all = Set.union (first |> Set.ofList) (second |> Set.ofList) |> Set.toList
    let firstMatches = all |> List.map (fun t -> first |> List.contains t)
    let secondMatches = all |> List.map (fun t -> second |> List.contains t)
    // Next, the total number if each combination will be calculated

Each attribute of a A and B can be either present (we will define ‘1’) or absent (we will define ‘0’). The total number of each combination of attributes for both A and B are specified as follows:

M11 represents the total number of attributes where A and B both have a value of 1.
M01 represents the total number of attributes where the attribute of A is 0 and the attribute of B is 1.
M10 represents the total number of attributes where the attribute of A is 1 and the attribute of B is 0.
M00 represents the total number of attributes where A and B both have a value of 0.

   // Now, calculate the total number if each combination
   let zipped = List.zip firstMatches secondMatches
   let M11 = zipped |> List.filter (fun t -> fst t = true && snd t = true ) |> List.length
   let M01 = zipped |> List.filter (fun t -> fst t = false && snd t = true ) |> List.length
   let M10 = zipped |> List.filter (fun t -> fst t = true && snd t = false ) |> List.length
   let M00 = zipped |> List.filter (fun t -> fst t = false && snd t = false ) |> List.length

Each attribute must fall into one of these four categories, meaning that
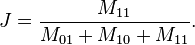
M11 + M01 + M10 + M00 = n

The Jaccard similarity coefficient, J, is given as:

Jaccard Similarity Coefficient

Jaccard Similarity Coefficient for asymmetric binary attributes

   // Calculate Jaccard Similarity Coefficient
   let J = float M11 / float (M01 + M10 + M11)
   // Return the calculated value
   J

To use the jaccardCoeff function:

[<EntryPoint>]
let main argv = 
    let simJobEmp1 = jaccardCoeff employee1Skills vacantJob
    let simJobEmp2 = jaccardCoeff employee2Skills vacantJob
    let simJobEmp3 = jaccardCoeff employee3Skills vacantJob
    printfn "Emp1: %fnEmp2: %fnEmp3: %f" simJobEmp1 simJobEmp2 simJobEmp3
    0 // Exitcode as int

The result will show, that the employee working as a System Engineer has the highest similarity followed by the employee working as a Project Manager:

Emp1: 0.125000
Emp2: 0.272727
Emp3: 0.307692

Original Post: https://www.redtoo.com/ch/blog/the-future-of-programming-is-functional/

Do you have problems with C# Tuple class because items are read only?

While I was working on a small Windows Form tool in C#, which should help me to save and load parameters for a command line application, I run into the problem that not the complete textbox controls should be saved, but only the name and the text content. So, I had the requirement to save only a subset of the form fields. After thinking a while, I came to the idea to use Linq in combination with the Tuple class and I did some research about Tuples at all.

In mathematics, a finite sequence of elements is called a Tuple and they rise popularity with the implementation of functional programming languages. Like in mathematics, in functional programming a certain variable has a single value at all the time. So, Tuples are immutable or in other words “read only” by design and implementations like in C# are following this design.

Beside other usage of Tuples in programming languages, it’s commonly used to return a subset of data. Think about following use case: i.e. there is a list of territory definitions with fields like ZIP Code, City, Region, Population etc. and this list must be filtered and only a subset of the territory fields should be returned.

Here a code snippet for the above mentioned class definition:

// Define a class to store data
class Territory { public int zip; public string city; public string region; };

With Linq we could pretty easy do the filtering requirement, but we would have difficulties to return only a subset of the fields. Here a sample how it could be done:

// Define a sample list of objects to work with
Territory[] myTerritories = new Territory[] {
                                new Territory{zip=4153,city="Reinach",region="BL"},
                                new Territory{zip=8304,city="Wallisellen",region="ZH"},
                                new Territory{zip=3018,city="Bern",region="BE"}};

// Select a complete Territory subset variant 1
var subset1 = from Territory t in myTerritories
                   where t.region.StartsWith("B")
                         select t;
// Select a complete Territory subset variant 2
var subset2 = myTerritories.Where(t => t.region.StartsWith("B"));

So, here comes the usage of Tuples. To return only a subset of the territory fields, this fields must be stored in new instances of the Tuple class. The result will be a list of Tuples instead of a list of Territories.

Here you find a code snippet, returning a subset of the territory structure in a list of Tuples after the filtering:

// Select only a subset of territory fields as a list of Tuples
var subset3 = myTerritories.Where(t => t.region.StartsWith("B"))
                           .Select(t => new Tuple<int, string>(t.zip, t.city));

The problem is now, that Tuples are immutable / read only and follwing code would not compile:

subset3.ElementAt(0).Item2 = "Reinach BL";

So, the best solution is, to define a new class simillar to the Tuple class with a propper constructor and use this class instead of the Tuple class. Here the complete sample code:

class Program
{
    // Define a class to store data
    class Territory { public int zip; public string city; public string region; };

    static void Main(string[] args)
    {
        // Define a sample list of objects to work with
        Territory[] myTerritories = new Territory[] {
                                      new Territory{zip=4153,city="Reinach",region="BL"},
                                      new Territory{zip=8304,city="Wallisellen",region="ZH"},
                                      new Territory{zip=3018,city="Bern",region="BE"}};

        // Select a complete Territory subset variant 1
        var subset1 = from Territory t in myTerritories
                           where t.region.StartsWith("B")
                                 select t;
        // Select a complete Territory subset variant 2
        var subset2 = myTerritories.Where(t => t.region.StartsWith("B"));

        // Select only a subset of territory fields as a list of Tuples
        var subset3 = myTerritories.Where(t => t.region.StartsWith("B"))
                                   .Select(t => new Tuple<int, string>(t.zip, t.city));

        // because tuples are immutable/read only, these
        // will not compile and therefore it's commented out:
        /* subset3.ElementAt(0).Item2 = "Reinach BL"; */

        // Select only a subset of territory fields as a list of entities
        var subset4 = myTerritories.Where(t => t.region.StartsWith("B"))
                                   .Select(t => new Entity<int, string>(t.zip, t.city));

        // because Entity is mutable these will work:
        subset4.ElementAt(0).Item2 = "Reinach BL";
    }
}
public class Entity<T1, T2>
{
    public Entity(T1 t1, T2 t2)
    {
        Item1 = t1;
        Item2 = t2;
    }
    public T1 Item1 { get; set; }
    public T2 Item2 { get; set; }
}
public class Entity<T1, T2, T3>
{
    public Entity(T1 t1, T2 t2, T3 t3)
    {
        Item1 = t1;
        Item2 = t2;
        Item3 = t3;
    }
    public T1 Item1 { get; set; }
    public T2 Item2 { get; set; }
    public T3 Item3 { get; set; }
}

So, I hope you had fun and please leave a comment.

Original Post: https://www.redtoo.com/ch/blog/do-you-have-problems-with-c-tuple-class-because-items-are-read-only/

Cloud Computing

Where can be the location of a Azure Resource Group?

When you create a new Resource Group, i.e. with the PowerShell Cmdlet New-AzureRmResourceGroup, there is a mandatory parameter called “Location”. This specifies in which Azure data center the resource group will be placed. A resource group can be placed in any location and does not have to be in the same location as the Azure subscription. Resource groups can contain resources from different locations.

To find out more use:

Get-Help New-AzureRmResourceGroup

.

To determine which location supports each resource type, use the Cmdlet:

Get-AzureRmResourceProvider -ListAvailable

.
You must be logged in you Azure Subscription for that.

To find out which Azure Data Center exists and with that, which values the -Location parameter can have (like “West Europe”, “East US” etc.) look at https://azure.microsoft.com/en-us/regions/.

Azure Resource Manager Portal

What is Microsoft Azure Resource Manager?

Cloud solutions are a combination of many single cloud services, like Azure Active Directory, Virtual Machines, Web Services, Databases and Storage Containers and more. With Azure Resource Manager this solutions can be handled as a group. This means, that the resources for the solution can be deployed, updated or deleted in a single, transactional coordinated operation.

All related resources for a solution are hold in a container and that is called a resource group. The resource group could include all of the resources for a solution, or only those resources that are logically grouped together. How to allocate resources to resource groups is a decision based on what makes the most sense for a organization. Those resource groups are the new concept in Azure that serves as the life-cycle boundary for all of its resources.

Azure Resource Manager Templates can be used for different environments such as testing, staging and production. After the deployment of the resources, Azure Resource Manager provides security, auditing, and tagging features to help with the management of the deployed resources.

If you want to find out more of Azure Resource Manager you can have a look at the Azure Resource Manager Overview by Tom FitzMacken here: Azure Resource Manager Overview

The new Azure Resource Manager Portal, or short the Azure Portal, is that all-in-one work-anywhere experience where to manage the above explained resource groups. It was built from the ground up and some time ago know as the Azure Preview Portal and puts now the applications at the center of the experience.

This unified hub radically simplifies building, deploying and managing cloud resources. Imagine a single, easy-to-use console built just for the user, teams and projects. It brings together all of the cloud resources, team members, and life-cycle stages of applications and provides the user with a centralized place to plan, develop, test, provision, deploy, scale, and monitor those applications. This approach can help teams embrace a BizDevOps culture by bringing all three, business, development and operations capabilities and perspectives together in a meaningful way.

The new portal allows each user to transform the portal home page (called the Startboard) into their own customized dashboard. Stay on top of the things that matter most by pinning them to the Startboard. Resize parts to show more or less data. Drill in for all the details. And see insights (and opportunities) across apps and resources.

oops

How to handle reboot and resume or continue in PowerShell with PowerShell Workflow

While developing a Azure Resource Manager Template with a virtual machine resource and custom script extension, I got the problem, that I have to install a software that needs a reboot and after the reboot, the script should continue to configure these software and install other applications.

The recommended way with custom script extensions is, to have one script, that acts like a start script calling other scripts doing the work. This sounds like a workflow. So I thought I can use PowerShell Workflow to handle this and I gave it a try. With PowerShell Workflow we have all mechanism to handle reboot and resume or continue in a PowerShell script, but it’s anyway a little bit tricky, because we have to use a scheduled task which will be triggered “At startup”.

It was not successful to use it in the Azure Resource Manager virtual machine extension because of other reasons (finally I solved it with Windows PowerShell Desired State Configuration (DSC)), but in general is PowerShell Workflow a fine technology for task which needs a state, because they might be suspended and resumed and could run in parallel. So I will share my experience with you.

First, lets think about the workflow and the single steps called “Activities”. What must be known in advance is, like I wrote already above, is, that PowerShell Workflow is designed to run activities in parallel and that each activity has it’s own workspace. That means, that results i.e. returned to variables cannot be used from the next activity. Each PowerShell command that runs within a workflow is a single, standalone activity. To run activities parallel, the parallel{} keyword must be used and when activites inside the parallel block should run in a defined order the sequence{} keyword must be defined.

For our purpose, following script snipped can be used:

Workflow New-ServerSetup
{
    parallel {
    "1. activity?"
    "2. activity?"
    "3. activity?"
    "4. activity?"
    "..."
    }
    Restart-Computer -Wait 
    "Last activity"
    "or more activities..."
}
# Run the workflow
New-ServerSetup

When this would be executed, the "Last activity" and "or more activities..." would not be processed, because with the Restart-Computer -Wait activity, the New-ServerSetup job will be suspended and will stay in that state after reboot. This can be checked after the server rebooted with

Get-Job
Check status of current jobs

Check status of current jobs

To manually resume the Job, just type

# In our case the job Id is 3. Check if you put the right Id
Resume-Job -Id 3
PowerShell Workflow Suspended, Running, Completed

PowerShell Workflow Suspended, Running, Completed

But, of course, we don’t have the possibility to start the job manually, when it’s executed from the Azure Resource Manager Template virtual machine extension. So, we have to define a scheduled task, resuming the job “at startup”:

Workflow New-ServerSetup
{
    "First activity"
    "Second activity"
    "..."
    Restart-Computer -Wait 
    "Last activity"
    "or more activities..."
    Unregister-ScheduledJob -Name NewServerSetupResume
}
# -------------------------------------------------------------------------
# Use the New-JobTrigger cmdlet to create an "At startup" trigger
# to resume the suspended job.
# Replace <Password> with a password of a administrator
# on the local machine. 
# -------------------------------------------------------------------------
$adm = "Administrator"
$pwd = ConvertTo-SecureString -String "<Password>" -AsPlainText -Force
$cred = New-Object System.Management.Automation.PSCredential($adm, $pwd)
$AtStartup = New-JobTrigger -AtStartup
Register-ScheduledJob -Name NewServerSetupResume `
                      -Credential $cred `
                      -Trigger $AtStartup `
                      -ScriptBlock {Import-Module PSWorkflow; `
                          Get-Job -Name NewSrvSetup -State Suspended `
                          | Resume-Job}

# Run the workflow. It is suspended when the computer restarts.
# We give a defined name for the job, to be able to use the name
# in the scheduled task, otherwise the name would be "Job<n>"
New-ServerSetup -JobName NewSrvSetup

To find out more about Windows PowerShell Workflows use:

Get-Help about_workflows
hashtag

How to put single line and multiline or block comments in Windows PowerShell

This seems to be a topic not worth for a post, but there are people looking with google for that.

In PowerShell single line comments start with a hash symbol and everything to the right of the # will be treated as comment and ignored as scripting code.

# This is a comment

Comments in PowerShell spanning multiple lines came with PowerShell 2.0. They start with "<#" and end with "#>". They can be placed anywhere, except inside strings, and anything between them will be treated as a comment.

<# This is a block comment #> Write-Host "Cmdlet after a block comment"
<# Here starts a
   multi line comment
#>
Write-Host "Cmdlet after a multi-line comment"

But there is more about comments. They can be used from the Get-Help cmdlet when a help keyword is given. This is then called comment-based help. This has to appear in one of three locations when they are used for functions:

  • At the beginning of the function body.
  • At the end of the function body.
  • Before the Function keyword. There cannot be more than one blank line between the last line of the function help and the Function keyword.

When used for scripts, the comments can appear in one of the following two locations in the script:

  • At the beginning of the script file. Script help can be preceded in the script only by comments and blank lines.
  • At the end of the script file. However, if the script is signed, place Comment-based help at the beginning of the script file. The end of the script is occupied by the signature block.
  • If the first item in the script body (after the help) is a function declaration, there must be at least two blank lines between the end of the script help and the function declaration. Otherwise, the help is interpreted as being help for the function, not help for the script.

To find out more, use:

Get-Help about_comment